
66 KiB
name, description
| name | description |
|---|---|
| dialogic | Dialogic 2 addon for Godot 4 — a dialog system with timelines, events, characters, subsystems, styles, layouts, variables, save/load, and text effects. Use when working with dialog trees, visual novel scenes, character portraits, branching conversations, or any Dialogic-related code in this project. |
Dialogic 2 Skill
Dialogic is a Godot 4 addon (addons/dialogic/) providing a full dialog and visual novel system. It is an autoload (Dialogic) with a modular subsystem/event architecture.
Official docs: https://docs.dialogic.pro/ Class Reference: https://docs.dialogic.pro/class_index.html
Architecture Overview
DialogicGameHandler (autoload "Dialogic")
├── Subsystems (modular, extendable)
│   ├── Animations    — tweening/transition helpers
│   ├── Audio         — sound effects, music, channels
│   ├── Backgrounds   — background images/scenes with transitions
│   ├── Choices       — branching choice menus
│   ├── Expressions   — expression/variable evaluation
│   ├── Glossary      — hover-to-inspect word definitions
│   ├── History       — conversation log
│   ├── Inputs        — keyboard/mouse input handling
│   ├── Jump          — label navigation & jump/return logic
│   ├── PortraitContainers — layout slots for portraits
│   ├── Portraits     — character portrait display & animation
│   ├── Save          — built-in save/load system
│   ├── Settings      — runtime settings
│   ├── Styles        — UI layout/style management
│   ├── Text          — text display with BBCode effects
│   ├── TextInput     — player text input prompts
│   ├── VAR           — variable storage & manipulation
│   └── Voice         — voice/audio per character line
Core Files
| File | Purpose |
|---|---|
addons/dialogic/Core/DialogicGameHandler.gd |
Autoload: manages state, timeline execution, subsystems |
addons/dialogic/Core/DialogicUtil.gd |
Static helpers (filesystem, variables, conversions, suggestions) |
addons/dialogic/Core/DialogicResourceUtil.gd |
Resource directory management, caches, lookups |
addons/dialogic/Core/Dialogic_Subsystem.gd |
Base class for all subsystems |
addons/dialogic/Resources/event.gd |
Base class for all events |
addons/dialogic/Resources/timeline.gd |
Timeline resource |
addons/dialogic/Resources/character.gd |
Character resource |
addons/dialogic/Resources/dialogic_style.gd |
Style resource |
addons/dialogic/Resources/dialogic_layout_base.gd |
Layout resource |
addons/dialogic/Resources/dialogic_layout_layer.gd |
Layout layer resource |
addons/dialogic/Resources/dialogic_style_layer.gd |
Style layer resource |
DialogicGameHandler API (Dialogic autoload)
Access via Dialogic (global autoload name) or DialogicUtil.autoload().
States (enum States)
IDLE— awaiting input to advanceREVEALING_TEXT— currently revealing textANIMATING— an animation is playingAWAITING_CHOICE— awaiting choice selectionWAITING— awaiting something (e.g., timer)
current_state property; state_changed(new_state) signal.
Pausing
Dialogic.paused = true   # pauses all subsystems (not the scene tree)
Dialogic.paused = false  # resumes
Signals: dialogic_paused, dialogic_resumed
Starting/Ending Timelines
# Start a timeline AND load a layout scene (use for first dialog)
var layout_node = Dialogic.start(timeline, label_or_idx)
# timeline: DialogicTimeline resource OR string path OR identifier name
# label_or_idx: optional label (string) or event index (int) to jump to

# Start without loading layout (use when layout already exists)
Dialogic.start_timeline(timeline, label_or_idx)

# Preload (prepare without playing)
var preloaded = Dialogic.preload_timeline(timeline_resource)

# End the current timeline
Dialogic.end_timeline(skip_ending:=false)

# Check if timeline exists
if Dialogic.timeline_exists(timeline): ...

# Only start dialog if none is active
if Dialogic.current_timeline == null:
    Dialogic.start("my_timeline")
Signals: timeline_started, timeline_ended, event_handled(resource)
Timeline Properties
Dialogic.current_timeline          # DialogicTimeline resource
Dialogic.current_timeline_events   # Array of event resources
Dialogic.current_event_idx         # int
Dialogic.current_state_info        # Dictionary of state info
Clear States (enum ClearFlags)
Dialogic.clear(Dialogic.ClearFlags.FULL_CLEAR)         # clear everything
Dialogic.clear(Dialogic.ClearFlags.KEEP_VARIABLES)      # keep variables
Dialogic.clear(Dialogic.ClearFlags.TIMELINE_INFO_ONLY)  # only clear timeline/index
Save/Load Full State
var state = Dialogic.get_full_state()   # returns Dictionary
Dialogic.load_full_state(state)         # restores full dialog state
Event Handling
Dialogic.handle_next_event()            # advance to next event
Dialogic.handle_event(event_index)      # jump to specific event index
Subsystem Access
All subsystems are accessible as properties:
Dialogic.Animations
Dialogic.Audio
Dialogic.Backgrounds
Dialogic.Choices
Dialogic.Expressions
Dialogic.History
Dialogic.Inputs
Dialogic.Jump
Dialogic.PortraitContainers
Dialogic.Portraits
Dialogic.Save
Dialogic.Settings
Dialogic.Styles
Dialogic.Text
Dialogic.TextInput
Dialogic.VAR
Dialogic.Voice
Dialogic.Glossary
Check existence: Dialogic.has_subsystem("SubsystemName")
Timeline Events
Events are scripts in addons/dialogic/Modules/<Module>/event_<name>.gd. They extend DialogicEvent (base class in Resources/event.gd).
Event Types
| Module | Event | Purpose |
|---|---|---|
| Text | event_text |
Display dialog text with character portrait |
| Character | event_character |
Join/leave/update character portraits |
| Choice | event_choice |
Present branching choices |
| Condition | event_condition |
Branch based on variable conditions |
| Audio | event_audio |
Play sound effects / music on channels |
| Background | event_background |
Change background with transition |
| Jump | event_jump |
Jump to a label |
| Jump | event_label |
Define a label target |
| Jump | event_return |
Return from a jump |
| Signal | event_signal |
Emit custom signals |
| Variable | event_variable |
Set/modify variables |
| Wait | event_wait |
Wait for a duration |
| WaitInput | event_wait_input |
Wait for player input |
| Clear | event_clear |
Clear subsystems |
| Comment | event_comment |
Editor-only comments |
| End | event_end |
End the timeline |
| Save | event_save |
Trigger save |
| Settings | event_setting |
Change runtime settings |
| Style | event_style |
Switch style/layout |
| Glossary | event_glossary |
Manage glossary |
| History | event_history |
Manage history |
| TextInput | event_text_input |
Prompt player for text |
| Voice | event_voice |
Play voice clip |
| Call | event_call |
Call a method on an autoload |
| Core | event_end_branch |
Internal branch-ending marker |
Timeline Text Format
Timelines use the .dtl file extension and are saved in a human-readable text format. You can edit them in any text editor — Dialogic's built-in text editor provides autocompletion and syntax highlighting.
To find all parameters available on each shortcode event, search for the event class name (e.g.
DialogicBackgroundEvent) in the Godot Help or the Dialogic documentation.
Indentation Rules
Timelines use TAB indentation to determine which events belong to a choice or condition block. Only changes in indentation matter — be consistent within one block, but the exact amount doesn't matter.
Custom-Syntax Events (bare text, no brackets)
Some events have a special syntax for easier writing:
Text Event:
# Plain text with no speaker — said by no one in particular
A simple line of narration or internal monologue.

# Speaker with optional portrait
CharacterName: Dialog text here.
CharacterName (portrait): Dialog text with a portrait change.

# Multi-line text — end a line with \ to include the next line
Emilio: This is a text event with \
multiple lines. Isn't that great? It is!
The \ continuation joins the next line into the same text event. Trailing whitespace after \ is ignored.
Character Event:
join CharacterName (portrait) position [animation="Bounce In"]
leave CharacterName [animation="Bounce Out" length="0.3"]
update CharacterName (portrait) position [animation="Tada" wait="true" repeat="3" move_time="0.3"]
Positions: left, center, right. The animation shortcode at the end contains optional parameters.
Condition Event (indentation-based blocks):
if {Player.Wisdom} > 3:
    # indented events run when condition is true
elif {Player.Health} <= 10:
    # another branch
else:
    # fallback — runs if no condition matched
Choice Event (each option starts with -):
- Yes, let's go!
    # indented events fire when this option is chosen
- No, not now. | [if {John.Relationship} > 23]
    # conditional choice — only shown if condition is true
- Maybe | [if {Stats.Charisma} > 10] [else="disable" alt_text="Maybe [too insecure]"]
The | separator attaches logic to the choice option. [if] controls visibility; [else] controls behavior when hidden (disable or hide).
Set Variable Event:
set {coins} = 20
set {Player.Health} += 10
set {Player.Shield} -= 5
set {Player.Damage} *= 1.5
set {Player.Speed} /= 2
set {player_name} = "Miko"
set Autoload.property = "Hello World"
Supported operators: =, +=, -=, *=, /=
Comment Event (editor-only, ignored at runtime):
# This is a comment — useful for notes and organization
Label Event:
label LabelIdentifier
label LabelIdentifier (Display Name)
Jump Event:
jump LabelIdentifier                 # jump to a label in the current timeline
jump TimelineName/LabelIdentifier    # jump to a label in another timeline
jump TimelineName/                   # jump to the beginning of another timeline
Return Event:
return
Returns from a previous jump to where the jump originated.
Do/Call Event:
do AutoloadName.method("argument")
Calls a method on any autoload singleton.
Shortcode Events (wrapped in [...])
Most other events use a shortcode style. Parameters are separated by at least one space (order doesn't matter). All parameter values must be wrapped in double quotes, regardless of type:
[background path="res://icon.png" fade="1.0"]
[audio path="res://music.ogg" channel="music" fade="1.0"]
[signal arg="activate_something"]
[end_timeline]
[wait time=1.5]
[clear time=0.5]
[style name="MyStyle"]
[save slot="auto"]
[text_input text="What's your name?" var="player_name" placeholder="Enter..." default="Hero" allow_empty="false"]
Full Example Timeline
[background path="res://assets/backgrounds/dialogic_factory.png"]

join Jowan left
Jowan (excited): Hello and welcome to[portrait=confused]...[pause=0.5] Wait? What is this?

join Emilio (happy) right
Emilio: Well, this is the example timeline.

Jowan: I thought this was a cool new feature?

Emilio: Nah, sorry.

Jowan (sad): It's okay.

# Choices loop back to this label
label WhatAbout

Jowan (default): So what should this example be about?
- How to bake cookies
    Emilio (confused): Wait that hasn't to do with dialogic?!
    jump WhatAbout

- How to reach the moon | [if {Player.Name} == "NASA"]
    Jowan (angry): NASA! It's you again. This is for making dialogs!\
    Please ask someone else about the moon!

    jump WhatAbout

- How to write timelines in text format
    Jowan: Oh, well it's pretty intuitive.[pause=0.2][portrait=questioning] I hope.

    Emilio: Let's hope it's easy as well.

[end_timeline]
Characters
Characters are .dch resources managed via DialogicResourceUtil:
var char = DialogicResourceUtil.get_character_resource("CharacterName")
var all_chars = DialogicResourceUtil.get_character_directory()
Character Properties
- Display Name: Shown on name labels. Can contain
{variables}. - Nicknames: Used for autocolor names feature.
- Default Portrait: Used when no portrait is specified (Character join,
[portrait]text effect). Does NOT affect Text events without a portrait. - Portraits: Dictionary of portrait name → scene settings. A portrait is a scene (
.tscn) instanced by Dialogic. The default portrait scene uses an image. Custom portraits extendDialogicPortrait. - Style: Optional custom style used when this character speaks.
- Sound Moods: Random typing sounds per portrait.
- Prefix/Suffix: Text segments wrapped around each text section (e.g., quotation marks).
- Scale, Offset, Mirror: Per-character and per-portrait transform settings.
Character lookup
Characters are found by identifier string in the dch_directory. The directory maps identifiers to file paths. By default, the identifier is derived from the filename (e.g., Miko.dch → "Miko"). The lookup is case-sensitive — ensure timeline text uses the exact same case as the .dch filename.
If a character is not found at runtime, Dialogic creates a temporary character with no portraits. Portraits won't display because change_speaker() skips characters with empty portraits.
Character Event
The Character event controls how characters with portraits appear, move, and leave the scene. It has three modes: Join, Leave, and Update.
Modes
| Mode | Keyword | Purpose |
|---|---|---|
| Join | join |
Add a character to the scene. Requires a position/transform. Uses In-animations. |
| Leave | leave |
Remove a character. Uses Out-animations. --All-- removes all joined characters. |
| Update | update |
Modify an existing character's portrait, position, mirroring, z-index, extra data, or play an animation. Only changes what is explicitly set — unspecified properties stay unchanged. |
Text Syntax
# Basic join — character at a preset position
join MyCharacter center

# Join with portrait and animation
join MyCharacter (SomePortrait) center [animation="Bounce In"]

# Join a character whose name contains spaces (quoted) with a grouped portrait
join "My Character" (Special/Crazy) center

# Join with manual transform (position, size, rotation)
join MyCharacter pos=x0.5y1 size=y400px rot=20

# Basic leave
leave MyCharacter

# Leave with animation parameters
leave MyCharacter [animation="Fade Down"]

# Leave all characters at once
leave --All--

# Update: animate the character
update MyCharacter [animation="Tada" length="2" wait="true"]

# Update: move character with tween
update MyCharacter left [move_time="1" move_trans="Elastic" move_ease="In"]

# Update: change portrait with crossfade
update MyCharacter (OtherPortrait) [fade_time="0.5"]
Main Settings
Character
The character identifier (from the .dch filename). If the name contains spaces, wrap it in double quotes: "My Character". For leave, use --All-- to remove all joined characters.
Portrait (optional)
The portrait to display, specified in parentheses after the character: (portrait_name). Portraits in groups use the full path: (Group/SubGroup/Portrait). The portrait can be an expression inside {curly braces}: ({PlayerPortrait}).
- Join: Uses the character's default portrait if omitted.
- Update: Does NOT change the portrait unless one is given (gated by
set_portrait). - Leave: Ignored.
Position / Transform
Defines where the character appears. Two approaches:
Preset positions — reference a PortraitContainer defined in your style layer:
join MyCharacter left
join MyCharacter center
Default presets: leftmost, left, center, right, rightmost. Add more by creating a custom portrait layer.
Manual transform commands — precise control with pos=, size=, rot=:
join MyCharacter pos=x0.5y1 size=y400px rot=20
pos=x0.5 y1— position (default: relative to viewport; x=1 is full width, y=1 is full height)pos=x100px y1%— can also usepxor%unitssize=x0.3y0.3— size relative to viewportrot=20— rotation in degrees around the portrait origin (usually bottom center)
The position defines the ORIGIN of the portrait container. When joining, position/size/rotation defaults are copied from the first portrait preset found — so pos=x0.3 alone is usually sufficient to vary along the x-axis.
Animation Settings (shortcode)
All animation parameters go in the [...] shortcode at the end:
| Parameter | Shortcode | Description |
|---|---|---|
| Animation name | animation="Bounce" |
Animation to play. Forgiving match: Fade Up, fade up in, fade In Up all resolve correctly. Join/Leave fall back to Settings defaults if omitted; Update plays nothing if omitted. |
| Length | length="1" |
Animation duration in seconds. Default: 0.5. |
| Wait | wait="true" |
If true, pauses the timeline until the animation finishes. Default: false. |
| Repeat | repeat="3" |
Update only. Number of times to repeat the animation. Default: 1. |
Fade Settings (shortcode, Update mode only)
Used when changing a portrait during an Update event:
| Parameter | Shortcode | Description |
|---|---|---|
| Fade animation | fade="Fade" |
Crossfade animation for portrait transition. Falls back to the default crossfade in Settings if omitted. |
| Fade length | fade_length="0.5" |
Crossfade duration in seconds. Default: 0.5. |
Move Settings (shortcode, Update mode only)
Used when changing position during an Update event to tween the movement:
| Parameter | Shortcode | Description |
|---|---|---|
| Move time | move_time="0.8" |
Tween duration in seconds. If 0 (default), the change is instant. |
| Move transition | move_trans="Elastic" |
Tween transition type. |
| Move easing | move_ease="In Out" |
Tween easing direction. |
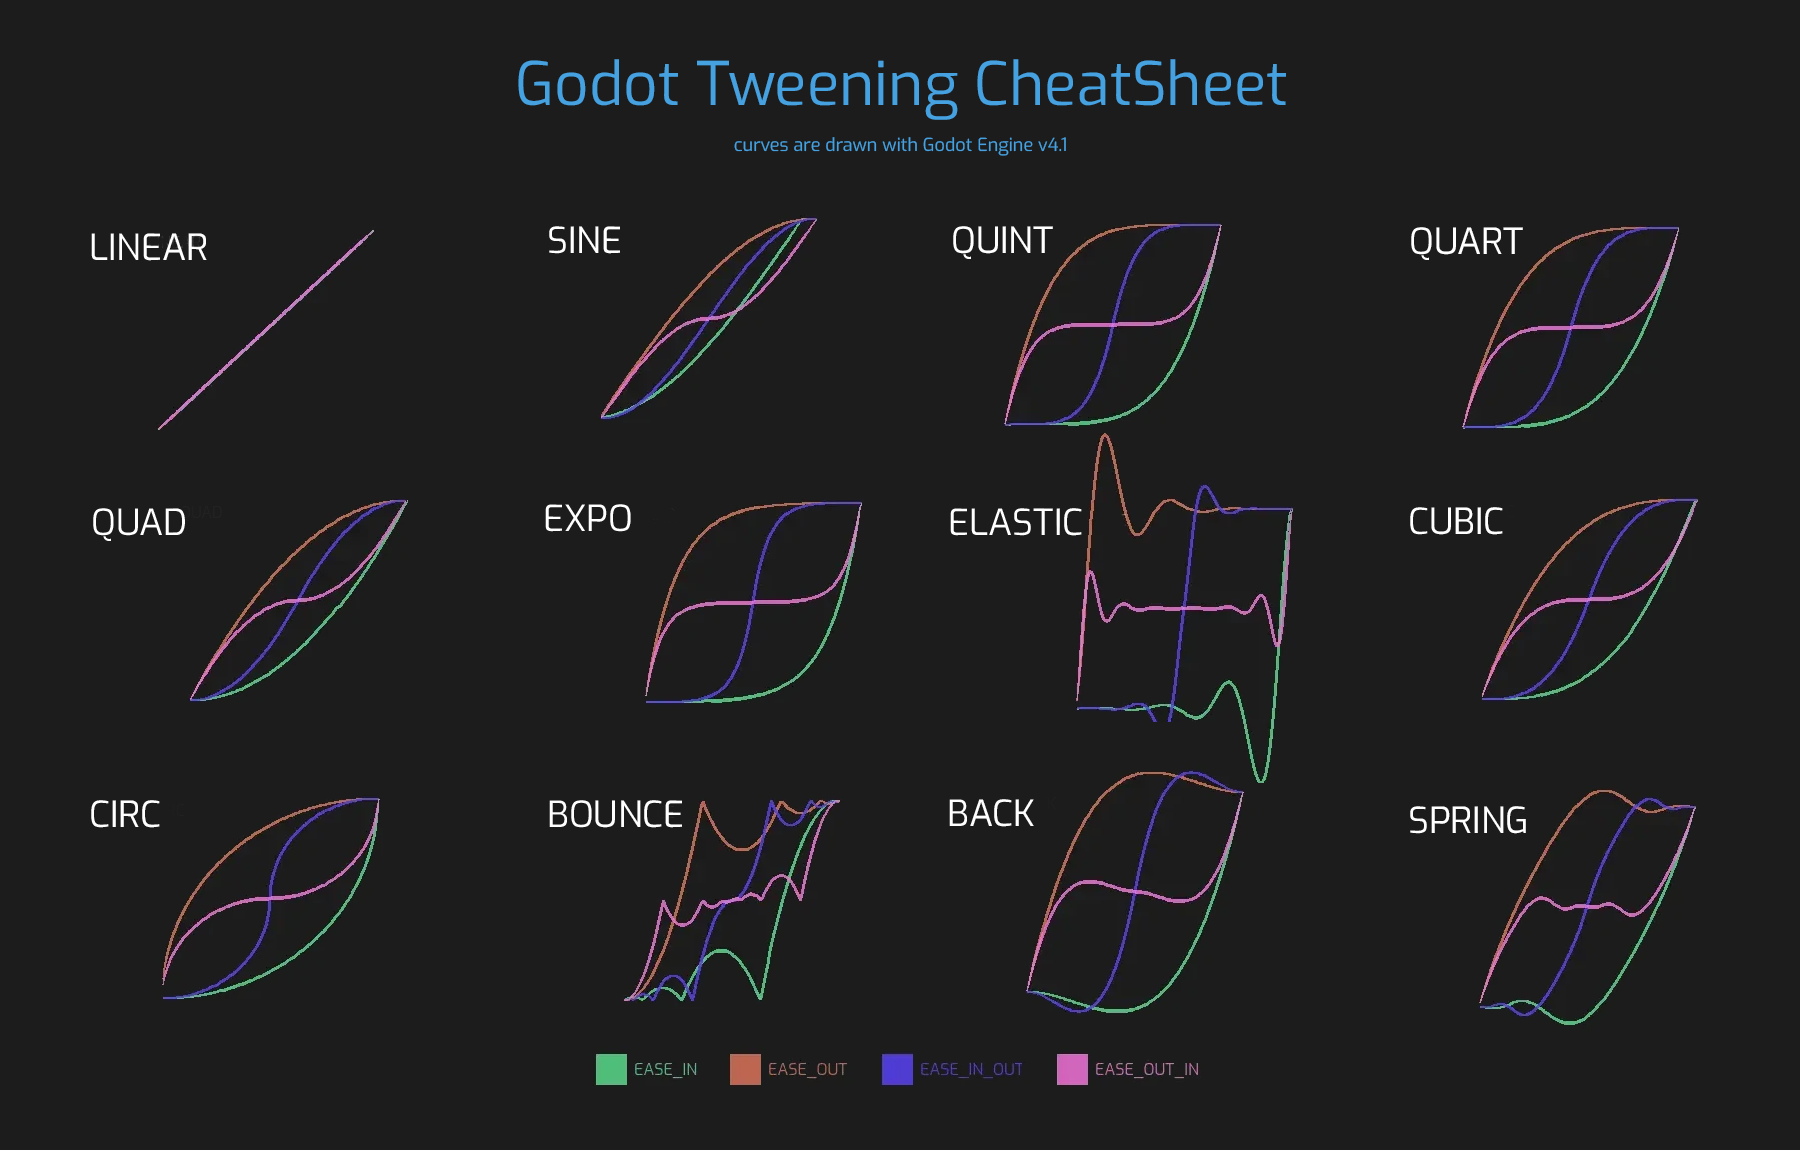
Transition types: Linear, Sine, Quint, Quart, Quad, Expo, Elastic, Cubic, Circ, Bounce, Back, Spring
Easing types: In, Out, In Out, Out In
Reference: Godot Tween Cheat Sheet
Other Settings (shortcode)
| Parameter | Shortcode | Description |
|---|---|---|
| Z-Index | z_index="2" |
Controls visual stacking order. Higher values appear in front. NOT Godot's native z_index — Dialogic sorts manually. |
| Mirrored | mirrored="true" |
Flips the portrait horizontally. Applied on top of the portrait's and container's mirror settings. |
| Extra Data | extra_data="something" |
Arbitrary string passed to the portrait scene. Handled by _set_extra_data(data) on custom portraits. |
Portrait Expressions
The portrait field supports {curly brace} expressions evaluated at runtime:
join MyCharacter ({PlayerPortrait}) center
update MyCharacter ({CurrentMood})
Useful for dynamic portrait switching based on variables.
Character with No Portraits
If a character has no portraits (empty portraits dictionary), the Character event editor hides portrait/position options. Timeline text using that character will still parse but no portrait will display.
Jump, Label & Return Events
These three events work together to control timeline flow: Label defines anchor points, Jump changes the current position (within or across timelines), and Return goes back to the last jump origin. Jumps use a stack to track where you came from.
Text Syntax
# Jump to the beginning of the current timeline (no target)
jump

# Jump to a label in the current timeline
jump LabelIdentifier

# Jump to a label in another timeline
jump TimelineName/LabelIdentifier

# Jump to the beginning of another timeline
jump TimelineName/

# Define a label (anchor point)
label LabelIdentifier

# Label with a display name (for debugging/history)
label LabelIdentifier (Display Name)

# Return to the last jump point
return
Dynamic labels: Labels can include {variables} for runtime resolution:
jump {day_phase}
How the Jump Stack Works
- When a Jump event executes, the current timeline + event index is pushed onto a stack.
- Execution moves to the target (label, timeline start, etc.).
- When a Return event executes, the stack is popped and execution resumes at the saved timeline + index.
- If the stack is empty when a Return event is hit, the timeline ends (
dialogic.end_timeline()).
This allows building reusable timeline "subroutines" — jump to a timeline, run it, and return to exactly where you left off.
Subsystem API (Dialogic.Jump)
# Jump to a specific label in the current timeline (bypasses the stack)
Dialogic.Jump.jump_to_label("LabelIdentifier")

# Resume from the last jump (pops the stack)
Dialogic.Jump.resume_from_last_jump()

# Check if the jump stack is empty
if Dialogic.Jump.is_jump_stack_empty():
    print("No jump to return to")

# Start a timeline at a specific label
Dialogic.start(timeline, "LabelIdentifier")

# Get info about the last passed label
var label_id = Dialogic.Jump.get_last_label_identifier()
var label_name = Dialogic.Jump.get_last_label_name()
Jump Signals
# Emitted when a Jump event switches to a different timeline
Dialogic.Jump.switched_timeline.connect(func(info):
    print("Switched from ", info.previous_timeline, " to ", info.timeline, " at ", info.label))
# info = {"previous_timeline": DialogicTimeline, "timeline": DialogicTimeline, "label": ""}

# Emitted when a Jump event jumps to a label (same or different timeline)
Dialogic.Jump.jumped_to_label.connect(func(info):
    print("Jumped to label ", info.label, " in ", info.timeline))
# info = {"timeline": DialogicTimeline, "label": "label_name"}

# Emitted when a Return event pops the stack
Dialogic.Jump.returned_from_jump.connect(func(info):
    print("Returned from ", info.sub_timeline, " to label ", info.label))
# info = {"sub_timeline": DialogicTimeline, "label": "label_name"}

# Emitted when a Label event is passed during execution
Dialogic.Jump.passed_label.connect(func(info):
    print("Passed label ", info.identifier, " (", info.display_name, ")"))
# info = {"identifier": "name", "display_name": "Name", "display_name_orig": "Name", "timeline": "timeline_id"}
Variables
Dialogic has a built-in variable system with folders, types, and expression evaluation. Variables can also reference external autoload singletons.
Storage Architecture
- Default values are stored in
ProjectSettingsunderdialogic/variablesas a nested Dictionary. This is where the Variables editor persists them. - Runtime values are stored in
Dialogic.current_state_info['variables']— a copy of the defaults merged with current state. - Folder grouping is represented by nested Dictionaries. A dotted path like
Player.Healthmaps to{"Player": {"Health": 100}}. - On
Dialogic.VAR.reset()orDialogic.clear(..., false), runtime values are reset to the defaults from ProjectSettings.
Variable Editor
Set up variables in the Dialogic "Variables" tab. Each variable has a name and default value. Variables can be organized into folders (nested Dictionaries). Inside a folder, no two items (variable or subfolder) can share the same name.
Variable types (from DialogicUtil.VarTypes enum):
ANY— auto-detected from default valueSTRING— textFLOAT— floating point numberINT— integerBOOL— true/false
Referencing Variables
Dialogic variables use dotted paths for folders; wrap in {curly braces}:
{coins}                          # root-level variable
{Player.Health}                  # variable inside a folder
{FolderA.FolderB.variable_name}  # nested folders
Autoload variables are referenced by AutoloadName.property:
{MySingleton.player_name}
{GameState.difficulty}
{MyAutoload.get_random_name()}   # method calls return their result
Complex expressions are supported:
{{Player.Health}/10.0+2}
Important: Dialogic variables (native, no autoload prefix) must be pre-declared in the Variables editor before they can be set by timeline set commands or referenced in text. Referencing an undeclared variable evaluates to null (empty string in text). Autoload variables do NOT need pre-declaration — they're accessed directly via the Expression class.
Availability: Variables are only accessible after the Dialogic autoload is _ready(). Do not read/write variables in _ready() of nodes that load before Dialogic.
Using Variables in the Timeline
In Text Events
Insert variable values with curly braces:
You have {coins} coins remaining.
Hello, {PlayerName}!
Next level at {MyAutoload.xp_required} XP.
Variables can also be used in:
- Character Display Names — type
{MyVariableName}in the character editor's display name field. - Glossary entries — titles, texts, and extras all support the same
{curly braces}syntax.
In Conditions
if {coins} >= 10:
    # indented events run when true
elif {Player.Health} <= 5:
    # another branch
else:
    # fallback
Conditions can also reference autoloads without curly braces (bare names are treated as autoload names by Godot's Expression class):
if GameState.difficulty == "hard":
if MyAutoload.check_info("Argument", false):
Use typical boolean operators: ==, !=, <, >, <=, >=, not, and, or, and parentheses for grouping.
Set Variable Event
Text syntax:
# Dialogic variables (pre-declared)
set {coins} = 20
set {Player.Health} += 2
set {Player.Shield} -= 5
set {Player.Damage} *= 1.5
set {Player.Speed} /= 2

# String assignment
set {player_name} = "Miko"

# Autoload variables (no pre-declaration needed)
set Autoload.property = "Hello World"
set Autoload.health = {Player.Health} + 2

# Complex expressions
set {Player.Health} += range(10, 20).pick_random()
Operations: = (SET), += (ADD), -= (SUBTRACT), *= (MULTIPLY), /= (DIVIDE)
String concatenation is supported with += when both the variable and value are strings.
Value types (selectable in the visual editor):
| Type | Example | Description |
|---|---|---|
| String | "Hello" |
Quoted string literal |
| Number | 42 or 3.14 |
Float or integer |
| Variable | {OtherVar} |
Value of another variable |
| Bool | true / false |
Boolean literal |
| Expression | range(10,20).pick_random() |
Complex GDScript expression |
| Random Number | range(0, 100).pick_random() |
Random integer in range |
Text Input Event
The Text Input event prompts the player to type text and stores the result in a dialogic variable:
[text_input text="What's your name?" var="player_name" placeholder="Enter name..." default="Hero" allow_empty="false"]
This is a specialized form of set variable that captures player keyboard input.
Accessing Variables from Code
Using Dialogic.VAR Subsystem
# Direct property access (simple and preferred)
Dialogic.VAR.coins = 42
print(Dialogic.VAR.coins)
Dialogic.VAR.Player.Health = 100          # folder access
print(Dialogic.VAR.Player.Health)          # 100

# String-based access (useful for dynamic variable names)
Dialogic.VAR.set_variable("coins", 42)
print(Dialogic.VAR.get_variable("coins"))
Dialogic.VAR.set_variable("Player.Health", 100)

# Check existence
if Dialogic.VAR.has("coins"):
    print("coins exists")

# Reset to defaults
Dialogic.VAR.reset()                      # reset all variables
Dialogic.VAR.reset("Player.Health")       # reset one variable to its default

# Parse curly-brace expressions in strings
var result = Dialogic.VAR.parse_variables("You have {coins} coins.")
Using DialogicUtil (static helpers)
DialogicUtil.get_default_variables()       # returns the full default variable dict
DialogicUtil.list_variables(dict, path)    # flatten to array of dotted paths
DialogicUtil.get_variable_type(path, dict) # get VarTypes enum value
DialogicUtil.get_variable_value_type(value) # get type of a value
DialogicUtil.logical_convert(value)        # auto-convert string to int/float/bool
Variable Folders
When accessing via direct property access (Dialogic.VAR.MyFolder), folders return a VariableFolder object that supports:
folders()— list all subfolders (asVariableFolderobjects)variables(absolute=false)— list variable names in this folderhas(name)— check if a variable or subfolder exists- Direct property access to child variables:
Dialogic.VAR.Towns.TownA.Church
Example:
# Pick a random location from nested folder structure
var location = Dialogic.VAR.Towns.folders().pick_random().variables().pick_random()
Variable Signals
# Emitted whenever any Dialogic variable changes
Dialogic.VAR.variable_changed.connect(func(info):
    print(info.variable, " changed to ", info.new_value))
# info = {"variable": "variable_name", "new_value": new_value}

# Emitted specifically from Set Variable events (not direct code sets)
Dialogic.VAR.variable_was_set.connect(func(info):
    print(info.variable, ": ", info.orig_value, " -> ", info.new_value))
# info = {"variable": name, "orig_value": old, "new_value": result, "value": change_value, "value_str": raw_string}
Writing Text
When writing text in Text events or Choice events, you can use four complementary systems: BBCode, Variables/Expressions, Text Modifiers, and Text Effects.
BBCode (Styling)
Standard Godot BBCode tags work in Text events for visual styling. Full reference: BBCode in RichTextLabel.
Common tags:
[b]Bold[/b]  [i]Italic[/i]  [u]Underline[/u]  [s]Strikethrough[/s]
[color=#ff0000]Colored text[/color]  [color=red]Named color[/color]
[font=res://my_font.ttf]Custom font[/font]  [font_size=24]Bigger text[/font_size]
[img=32x32]res://icon.png[/img]                    # inline image
[url=https://example.com]Link[/url]                # clickable link
[wave amp=20 freq=2]Wave effect[/wave]             # animated wave
[tornado radius=10 freq=5]Tornado effect[/tornado]  # animated shake
[shake rate=10 level=15]Shake effect[/shake]        # animated shake
[fade start=4 length=20]Fade effect[/fade]          # fading characters
[rainbow freq=0.2 sat=1 val=1]Rainbow text[/rainbow] # color cycling
Important: BBCode tags must be properly paired with closing tags ([/tag]). This differs from Text Effects which have no closing tag.
Choice buttons: Standard choice buttons use Label (not RichTextLabel), so BBCode won't work there. To get BBCode on choices, use a custom choice button with RichTextLabel.
Variables / Expressions in Text
Anything in {curly braces} inside text is treated as an expression and evaluated at display time. The result is inserted as text:
You have {coins} coins remaining.
Hello, {PlayerName}!
Current HP: {Player.Health}                         # folder path
Next level at {MyAutoload.xp_required} XP.           # autoload property
Your lucky number is {MySingleton.get_random_name()} # autoload method
Stat bonus: {{Player.Health}/10.0+2}                 # complex expression
- Dialogic variables — resolved by dotted path:
{coins},{Player.Health},{FolderA.FolderB.var} - Autoload properties — resolved via Godot's
Expressionclass:{MySingleton.some_property} - Autoload methods — called and result inserted:
{MyAutoload.get_random_name()} - Complex expressions — nested braces for calculations:
{{Player.Health}/10.0+2}
Important: Dialogic-native variables must be pre-declared in the Variables editor. Referencing an undeclared variable evaluates to null and displays as an empty string. Autoload variables don't need pre-declaration.
Text Modifiers (Preprocessors)
Text modifiers run before the text is displayed, transforming the text string. They work in both Text events and Choice events (most of them).
See the Text Modifiers section below for the full list.
Text Effects (Reveal-Time Actions)
Text effects are tags that trigger an action when the text reveal reaches that position. They are NOT paired — there is no closing tag. They work only in Text events.
See the Text Effects section below for the full list.
Text Speed System
Dialogic has three interacting speed controls:
| Control | Scope | Description |
|---|---|---|
| Letter speed | Per-event (via [lspeed]) |
Time in seconds for each letter to reveal. Default set in Text Settings. |
| Speed multiplier | Per-event (via [speed]) |
Multiplies letter speed and pause length. 1 = normal, 0 = instant, >1 = slower. Resets each Text event. |
| Text Speed setting | Global (via Dialogic.Settings) |
Global multiplier; stored automatically. Use for in-game speed options: Dialogic.Settings.text_speed = 0.5 |
All three multiply together: actual_delay = letter_speed × speed_multiplier × text_speed_setting
Adding ! to [lspeed=x!] or [pause=x!] makes the value absolute (ignores both multipliers).
Custom Text Modifiers
Custom modules can register text modifiers by implementing _get_text_modifiers():
func _get_text_modifiers() -> Array[Dictionary]:
    return [
        {
            "subsystem": "MySubsystem",
            # or "node_path": "/root/MyAutoload",
            "method": "my_modifier_method",
            "mode": -1  # -1 = Text & Choice, 0 = Texts only, 1 = Choices only
        }
    ]
The modifier method receives a String and must return a String:
func my_modifier_method(text: String) -> String:
    # transform text here (regex, custom syntax, etc.)
    return text
Text Effects (inline BBCode)
Text effects are tags within TextEvent text that trigger actions when reached during text reveal:
| Effect | Syntax | Purpose |
|---|---|---|
| Speed | [speed=x] / [speed] |
Set speed multiplier (1 = normal, 0 = instant). Resets per event. |
| Letter Speed | [lspeed=x] / [lspeed] / [lspeed=x!] |
Set letter reveal time in seconds. Bare resets to default. ! makes it absolute (ignores multipliers). |
| Pause | [pause=x] / [pause=x!] |
Pause reveal for x seconds. ! makes it absolute. |
| Portrait | [portrait=name] |
Switch speaker's portrait mid-text. |
| Signal | [signal=arg] |
Emit Dialogic.text_signal with argument. |
| Mood | [mood=name] |
Change typing sound mood. |
| Extra Data | [extra_data=value] |
Set extra data on speaker's portrait. |
| New Event | [n] / [n+] |
Split text into manual-advance sections. + appends to previous without clearing. |
| Input | [input] |
Await any input (can be skipped). |
| Auto-Advance | [aa] / [aa=x] / [aa=x?] |
Enable auto-advance. x sets time. ? sets time without enabling. |
| No Skip | [ns] / [ns=x] |
Disable text skipping for this event. x sets auto-advance time. |
Important: Text effects are NOT paired — there is no [/speed] closing tag. Effects change behavior from that point until the next text event resets them. Writing [/speed] will appear as visible text.
Text Modifiers (preprocessors)
Text modifiers run on text before display:
| Modifier | Syntax | Purpose |
|---|---|---|
| Line Break | [br] |
Insert line break (useful in choices or with "New Lines as New events") |
| Random Selection | <Option1/Option2/Option3> |
Random variation for repeated text |
| Conditional Text | [if {cond} Text if true./Text if false.] |
Inline conditional text |
| Autopauses | (automatic) | Insert [pause] after configured punctuation characters |
Auto-Advance
Auto-Advance automatically progresses the timeline without user input — ideal for hands-free reading or visual novel "auto-forward" modes. It is managed through Dialogic.Inputs.auto_advance, a DialogicAutoAdvance object.
Enable Flags (Stackable)
Auto-Advance uses three independent boolean flags — if any is true, Auto-Advance is active. This stacking allows multiple systems to enable it without conflicting:
| Flag | Set via | Stays enabled until |
|---|---|---|
enabled_until_user_input |
Player toggles Auto-Advance on | Player presses any Dialogic input action |
enabled_until_next_event |
[aa] text effect or code |
The next text event begins |
enabled_forced |
Code: auto_advance.enabled_forced = true |
Code: auto_advance.enabled_forced = false |
Example: If the player enables Auto-Advance AND a text event uses [aa], disabling one flag won't stop it until all flags are cleared.
Configuring from Code
# Enable Auto-Advance (player toggle)
Dialogic.Inputs.auto_advance.enabled_until_user_input = true

# Enable until next event (e.g., for a cutscene)
Dialogic.Inputs.auto_advance.enabled_until_next_event = true

# Force enable (script-controlled)
Dialogic.Inputs.auto_advance.enabled_forced = true

# Check if currently enabled
if Dialogic.Inputs.auto_advance.is_enabled():
    print("Auto-advancing")

# Check if currently waiting (timer active)
if Dialogic.Inputs.auto_advance.is_advancing():
    print("Timer running: ", Dialogic.Inputs.auto_advance.get_time_left())
Delay Calculation
When Auto-Advance starts, the delay is calculated from the current text:
delay = (per_word_delay × word_count + per_character_delay × char_count) × delay_modifier + fixed_delay
| Property | Default | Description |
|---|---|---|
fixed_delay |
1.0 |
Base delay in seconds added after other calculations |
per_word_delay |
0.0 |
Extra seconds per whitespace-separated word |
per_character_delay |
0.1 |
Extra seconds per character (excluding ignored characters) |
delay_modifier |
1.0 |
Global multiplier on per-word + per-character delays (NOT on fixed_delay). Set via Dialogic.Settings.autoadvance_delay_modifier for player-configurable reading speed. |
await_playing_voice |
true |
If true, waits for voice audio to finish before advancing |
ignored_characters_enabled |
false |
If true, certain characters are excluded from the character count |
ignored_characters |
{} |
Dictionary of characters to ignore when counting |
Temporary override per event via [aa=x]: sets override_delay_for_current_event, which replaces the entire calculation (but still respects await_playing_voice).
# Adjust delays dynamically (e.g., for different languages)
Dialogic.Inputs.auto_advance.per_word_delay = 0.3
Dialogic.Inputs.auto_advance.per_character_delay = 0.1

# Set a global reading speed modifier (player setting)
Dialogic.Settings.autoadvance_delay_modifier = 0.5   # 2x faster
Text Effect: [aa]
| Syntax | Behavior |
|---|---|
[aa] |
Enables Auto-Advance until the next text event |
[aa=2] |
Enables Auto-Advance AND sets the delay to 2 seconds (absolute, ignores per_word/per_character) |
[aa=2?] |
Does NOT enable Auto-Advance, but sets the delay to 2 seconds IF already enabled |
Signals
# Emitted when Auto-Advance should progress (triggers handle_next_event)
Dialogic.Inputs.auto_advance.autoadvance

# Emitted when Auto-Advance toggles on/off
Dialogic.Inputs.auto_advance.toggled.connect(func(enabled: bool):
    print("Auto-Advance ", "enabled" if enabled else "disabled"))

# Force an immediate advance
Dialogic.Inputs.auto_advance.autoadvance.emit()
Querying Progress
# Timer progress from 0.0 to 1.0 (returns -1 if not advancing)
var progress = Dialogic.Inputs.auto_advance.get_progress()

# Time remaining before the next advance
var remaining = Dialogic.Inputs.auto_advance.get_time_left()
Useful for building an Auto-Advance indicator UI (progress bar or countdown) in your layout layer.
Manual-Advance
Manual-Advance is the default way players progress through timelines — clicking or pressing the dialogic_default_action input to move forward event by event. It's managed through Dialogic.Inputs.manual_advance, a DialogicManualAdvance object.
Controlling Manual-Advance
Two properties control whether the player can advance:
| Property | Type | Description |
|---|---|---|
system_enabled |
bool (default true) |
Master switch. When false, player input is completely ignored. |
disabled_until_next_event |
bool (default false) |
Temporarily blocks input for the current event only. Overrides system_enabled. |
# Disable all player input (e.g., during a cutscene)
Dialogic.Inputs.manual_advance.system_enabled = false

# Block input just until the next event (e.g., [ns] text effect uses this)
Dialogic.Inputs.manual_advance.disabled_until_next_event = true

# Check if the player can currently advance
if Dialogic.Inputs.manual_advance.is_enabled():
    print("Player can advance")
# Equivalent to: system_enabled and not disabled_until_next_event
Input Events
Dialogic listens for the input action configured in dialogic/text/input_action (default: dialogic_default_action). Input is handled via:
- Keyboard/controller →
_unhandled_input()(non-mouse events) - Mouse →
_input()orhandle_node_gui_input()(via InputCatcher/Textbox nodes)
Blocking input temporarily: Dialogic automatically blocks input for ~100ms after text finishes revealing to prevent accidental double-clicks. Call Dialogic.Inputs.block_input(time) to extend this.
# Block all input for 0.5 seconds
Dialogic.Inputs.block_input(0.5)

# Check if input is currently blocked
if Dialogic.Inputs.is_input_blocked():
    print("Input is blocked")
Input Action Signals
# Priority signal — fires first. Set action_was_consumed = true to swallow the input
Dialogic.Inputs.dialogic_action_priority.connect(func():
    if some_condition:
        Dialogic.Inputs.action_was_consumed = true)

# Main action signal — fires if action_was_consumed is still false
Dialogic.Inputs.dialogic_action.connect(_on_dialogic_action)

# Check if the input came from a mouse
if Dialogic.Inputs.input_was_mouse_input:
    print("Mouse click")
Auto-Skip
Auto-Skip rapidly advances through the timeline, bypassing animations, text reveal, and audio. It's useful for quickly navigating already-seen story branches or debugging. Managed through Dialogic.Inputs.auto_skip, a DialogicAutoSkip object.
Core Settings
| Property | Type | Default | Description |
|---|---|---|---|
enabled |
bool |
false |
Master toggle. Toggling it emits the toggled signal. |
time_per_event |
float |
0.1 |
Maximum seconds each event may take. Events themselves must respect this — it's not enforced centrally. |
skip_voice |
bool |
true |
If true, voice audio is skipped instead of played. |
Auto Disable/Enable Conditions
| Property | Type | Default | Description |
|---|---|---|---|
disable_on_user_input |
bool |
true |
Disables Auto-Skip when the player presses any Dialogic input action. |
disable_on_unread_text |
bool |
false |
Disables when reaching a text event the player hasn't seen before. Requires History subsystem. |
enable_on_visited |
bool |
false |
Enables Auto-Skip when reaching a previously-visited text event. |
# Toggle auto-skip (e.g., from a button)
Dialogic.Inputs.auto_skip.enabled = !Dialogic.Inputs.auto_skip.enabled

# Debug mode: skip everything including unseen text
Dialogic.Inputs.auto_skip.disable_on_unread_text = false
Dialogic.Inputs.auto_skip.enabled = true

# Reduce time per event for faster skipping
Dialogic.Inputs.auto_skip.time_per_event = 0.05
Auto-Skip Signal
Dialogic.Inputs.auto_skip.toggled.connect(func(is_enabled: bool):
    if is_enabled:
        print("Auto-Skip started")
    else:
        print("Auto-Skip stopped"))
Implementing Auto-Skip in Custom Events
Auto-Skip behavior must be implemented per event. Two patterns:
Capping time-based operations:
var animation_length: float = 10.0

if Dialogic.Inputs.auto_skip.enabled:
    animation_length = min(Dialogic.Inputs.auto_skip.time_per_event, animation_length)
Reacting to the toggle for signal-based events:
func _execute() -> void:
    if Dialogic.Inputs.auto_skip.enabled:
        finish()  # skip instantly
        return
    # Normal execution path
    await some_signal
    finish()
Summary: Three Ways to Advance
| Method | Trigger | Speed | Player Control |
|---|---|---|---|
| Manual-Advance | Player input (dialogic_default_action) |
Player-paced | Full |
| Auto-Advance | Timer after text reveal | Configurable delay (per-word/character) | Player toggles on/off |
| Auto-Skip | Timeline events auto-execute | Time-capped per event | Player toggles on/off; stops on unseen text |
Styles & Layouts
Three systems work together to display timelines: Dialogic Nodes, Layout Scenes, and Styles.
Concepts
- Dialogic Nodes (
DialogicNode_*) — UI control nodes (DialogText, NameLabel, PortraitContainer, ChoiceButton, etc.) that are activated by Dialogic subsystems. They register themselves in groups (dialogic_set_DialogText,dialogic_set_NameLabel, etc.) so subsystems can find them. - Layout Scenes — Reusable scenes containing Dialogic Nodes, other Godot Control nodes, and custom scripts. They provide self-contained UI parts (e.g.
VisualNovel Textbox Scene,Glossary Popup Scene,Centered Choices Scene).- Base layout extends
DialogicLayoutBase— the root scene that holds everything. - Layer layouts extend
DialogicLayoutLayer— child scenes added as layers to the base.
- Base layout extends
- Styles (
.tresresources of typeDialogicStyle) — combine one base layout + list of layer layouts with overridable export settings. Styles can inherit from other styles (inherits scenes and default settings).
Style Structure
A DialogicStyle resource contains:
name— style identifier (used by[style]events,load_style())inherits— optional parent style for inheritancelayer_list— ordered array of layer IDslayer_info— Dictionary mapping layer ID (empty string""for the base) toDialogicStyleLayerresources, each holding:scene—PackedScenereferenceoverrides— Dictionary of export variable overrides applied at runtime
Style Inheritance
A style can inherit from another. The inheritance chain works as follows:
get_layer_inherited_list()returns the root ancestor's layer list (layers are always defined by the root).get_layer_inherited_info(id)merges overrides walking up the chain — child overrides override ancestor overrides.get_inheritance_root()walks the chain to the topmost style.realize_inheritance()flattens inheritance into the local style, then detaches the parent.
Style Editor (Dialogic UI)
In the Dialogic Style Editor tab you can:
- Add new styles (empty or from a premade template)
- Rename styles
- Add, replace, or remove layers (both premade and custom scenes)
- Override export settings on any scene in the style
- Make a premade layer or whole style custom (copies the scene into your project so you can edit it)
- Create inherited styles
- Change the default style
Important: When customizing a premade layout, make sub-resources (fonts, images, scripts) unique before modifying them. Resources still inside addons/dialogic/ may be lost when updating Dialogic. Using "Make Custom" on the layer automatically handles the root script.
Subsystem API (Dialogic.Styles)
# Load/switch styles
Dialogic.Styles.load_style("StyleName")       # load a fresh style (use before Dialogic.start() or select style before _ready)
Dialogic.Styles.change_style("StyleName")     # switch style mid-dialog, preserving current state (reloads dialog nodes)
Dialogic.Styles.preload_style("StyleName")    # preload scene resources in background

# Query current state
Dialogic.Styles.has_active_layout_node()       # bool: is a layout node present in the tree?
Dialogic.Styles.get_layout_node()              # returns the DialogicLayoutBase root node (null if none)
Dialogic.Styles.get_current_style()            # returns the current style name (empty string if none)

# Node lookup within the active layout
Dialogic.Styles.get_first_node_in_layout("group_name")  # like get_first_node_in_group() but scoped to the layout subtree

# Signals
Dialogic.Styles.style_changed.connect(_on_style_changed)  # emits info: {"style": name, "previous": prev_name}
load_style() vs change_style():
load_style()— use when no layout is active yet (e.g. beforeDialogic.start()). Creates a fresh layout.change_style()— use mid-dialog. It callsload_style()withstate_reload=true, which reloads the current dialog state into the new layout's nodes after the new scene is ready. This preserves text, portraits, choices, etc. across the style switch.
When load_style() detects the same scene setup (same inheritance root), it only applies new export overrides without recreating nodes — this is fast and non-disruptive.
Changing Styles at Runtime
Via timeline event:
[style name="MyStyle"]
This calls Dialogic.Styles.change_style() and waits one frame for the layout to be ready before continuing.
Via code (pre-start):
Dialogic.Styles.load_style("MyStyle")
Dialogic.start("my_timeline")
Per-character style:
Assign a style to a DialogicCharacter resource (in the Character editor). When that character speaks, Dialogic temporarily switches to their style (non-base style), then reverts when another character speaks or the base style is restored.
Creating Custom Layout Scenes
To create a custom layout scene from scratch:
- Create a new scene with a root node extending
DialogicLayoutBase(for a base) orDialogicLayoutLayer(for a layer). - Export variables on the root script — they automatically appear as settings in the Style Editor. Use
@export_groupand@export_subgroupfor organization. Not all variable types are supported. - Override
_apply_export_overrides()to apply exported settings to your nodes. This method is called:- When the style is first loaded
- When switching to a different style that uses the same scene (only overrides are re-applied)
Base layout (DialogicLayoutBase) additionally provides:
add_layer(layer)— add aDialogicLayoutLayeras a childget_layers()— get all layer childrenget_global_setting(setting, default)— retrieve a setting that layers can share (e.g. color themes)_get_persistent_info()/_load_persistent_info(info)— persist and restore data across style changes viaEnginemetadata
Layer layout (DialogicLayoutLayer) additionally provides:
disabledexport — iftrue, the layer is hidden and processing disabledapply_overrides_on_readyexport — iftrue,_apply_export_overrides()runs on_ready()(automatically set when making a layer custom)get_global_setting(setting, default)— delegates to the parent base
Adding custom scenes to a style: Use the Style Editor's Add Layer or Replace Layer buttons above the layer list. Your custom scene appears as an option.
Creating Custom Dialogic Nodes
Each Dialogic Node is a normal Control node with a script that registers itself in a group. Subsystems find their nodes via groups. Customizing a Dialogic node means:
- Duplicate the existing node scene and modify it.
- Ensure it still registers itself in the expected group(s).
- In most cases, reacting to Dialogic signals (or signals of existing nodes) is easier than creating a custom node from scratch.
Preloading for Performance
To avoid lag when a style is first loaded, preload it during a loading screen:
# Request threaded preload
Dialogic.Styles.preload_style("MyStyle")

# Or call on the style resource directly
style_resource.prepare()
Project Settings
Key settings under dialogic/layout/:
default_style— path to the default style resourceend_behaviour— 0=free (keep layout), 1=hide (hide on end), 2=keep layout visiblestyle_list— array of all style resource pathsstyle_directory— dictionary mapping style names → paths (built automatically)
StyleEvent Timeline Shortcode
[style name="StyleName"]
Key Troubleshooting
- Style not found at runtime: Ensure the style
.tresfile is listed indialogic/layout/style_listin ProjectSettings. Thestyle_directoryis rebuilt byDialogicStylesUtil.update_style_directory(). - Changes lost on update: After using "Make Custom", ensure sub-resources (fonts, images, shaders) are saved outside
addons/dialogic/. Click "Make Unique" on any shared sub-resources. - Layout not appearing:
Dialogic.start()callsload_style()automatically if no layout is active.Dialogic.start_timeline()does NOT — you must callDialogic.Styles.load_style()first. - Double layout nodes: Guard with
if not Dialogic.Styles.has_active_layout_node():before callingload_style().
Signals & Signal Events
Signal Event
Emits Dialogic.signal_event with an argument:
Dialogic.signal_event.connect(_on_dialogic_signal)

func _on_dialogic_signal(argument: String):
    if argument == "activate_something":
        print("Activated!")
Text Signal (via [signal=arg] text effect)
Emits Dialogic.text_signal:
Dialogic.text_signal.connect(_on_dialogic_text_signal)
Timeline Start/End
Dialogic.timeline_started.connect(_on_timeline_started)
Dialogic.timeline_ended.connect(_on_timeline_ended)
Key Subsystem Signals
Dialogic.Text.about_to_show_text(info: Dictionary)
Dialogic.Text.text_finished(info: Dictionary)
Dialogic.Text.speaker_updated(character: DialogicCharacter)
Dialogic.Text.textbox_visibility_changed(visible: bool)
Dialogic.Text.animation_textbox_new_text       # emitted when new text starts animating in
Dialogic.Text.animation_textbox_show           # emitted when textbox show animation starts
Dialogic.Text.animation_textbox_hide           # emitted when textbox hide animation starts
Dialogic.Portraits.character_joined(info: Dictionary)
Dialogic.Portraits.character_left(info: Dictionary)
Dialogic.Portraits.character_portrait_changed(info: Dictionary)
Dialogic.VAR.variable_changed(info: Dictionary)
Dialogic.VAR.variable_was_set(info: Dictionary)  # only from set variable events
Saving & Loading
# Simple save/load (takes screenshots too)
Dialogic.Save.save("slot_name")
Dialogic.Save.load("slot_name")

# Save without screenshot
Dialogic.Save.save("slot_name", false, Dialogic.Save.ThumbnailMode.NONE)

# Save with extra info (date, custom data)
var extra = {"text": Dialogic.current_state_info["text"], "date": Time.get_datetime_string_from_system(false, true)}
Dialogic.Save.save("slot_name", false, Dialogic.Save.ThumbnailMode.STORE_ONLY, extra)

# Check if slot exists
if Dialogic.Save.has_slot("slot_name"):
    var info = Dialogic.Save.get_slot_info("slot_name")
Savegames store Dialogic's timeline state and variables. Extra info is stored per-slot but not loaded into Dialogic state.
Global Data (Slot-Independent)
For data that should persist across all save slots (e.g., settings, preferences), use Dialogic.Settings or Dialogic.Save global info:
# Simple: store directly on Settings (auto-saved)
Dialogic.Settings.text_speed = 0.5

# Explicit: store arbitrary global key-value pairs
Dialogic.Save.set_global_info("player_name", "Miko")
var name = Dialogic.Save.get_global_info("player_name", "Unknown")
Saving Visited Events History
Dialogic's History subsystem can persist which text events the player has already seen:
# Enable auto-saving visited history on every save
Dialogic.History.save_already_visited_history_on_save = true
Dialogic.History.save_already_visited_history_on_autosave = true

# Manual control
Dialogic.History.save_visited_history()
Dialogic.History.load_visited_history()
Dialogic.History.reset_already_visited_history()
Slot Management
# Check if a slot exists
if Dialogic.Save.has_slot("slot_name"):
    Dialogic.Save.load("slot_name")

# Delete a slot
Dialogic.Save.delete_slot("slot_name")

# Create an empty slot
Dialogic.Save.add_empty_slot("slot_name")
Manual Save/Load (Full State)
For custom save pipelines, capture and restore Dialogic's entire state:
var state: Dictionary = Dialogic.get_full_state()
# ... store/retrieve state however you want ...
Dialogic.load_full_state(state)
Reference Manager
Dialogic's Reference Manager (toolbar Link button) handles unique identifiers for timelines and characters, and fixes broken references after renames.
Unique Identifiers
Each .dtl timeline and .dch character gets a unique identifier string (initially derived from the filename, but editable). No two resources of the same type can share an identifier. These identifiers are what you use in timeline text (CharacterName:, jump TimelineName/).
In the Reference Manager's second tab, you can double-click any identifier to rename it. Renaming automatically adds an entry to the "Broken References" tab.
Broken References
When you rename a resource, timelines referencing the old identifier break. The Reference Manager's first tab helps fix this:
- Dialogic may auto-add renames. Review them.
- Click Check Selected to scan all timelines for the references.
- Review the results, uncheck any false positives.
- Click Replace to apply.
Warning: This is a destructive bulk operation on all affected timelines. Commit to version control first.
Custom Replacements (Advanced)
Click the Plus button for manual replacements:
- Pure Text — custom string or regex. Use
(?<replace>something)group to replace only a portion. - Variable / Portrait / Character / Timeline — specialized regex for each type.
- Optionally limit to a specific character (useful for portrait renames).
Glossary
Dialogic's built-in glossary auto-highlights defined terms in dialog text and shows a tooltip with the definition on hover.
How It Works
A glossary is a .tres resource with an entries array of Dictionaries. Each entry has:
name— the primary termalternatives— aliases that also trigger highlightingtext— definition shown in the tooltipextra— additional data
When a glossary is loaded, Dialogic scans text for matching names/alternatives and applies highlighting automatically. Variables can be used in glossary titles, texts, and extras via {curly braces}.
Accessing Glossaries from Code
# Get all glossary file paths
var paths: Array = ProjectSettings.get_setting('dialogic/glossary/glossary_files', [])

# Load and inspect a glossary
var glossary: DialogicGlossary = load(paths[0])
for entry in glossary.entries:
    print(entry.name, ": ", entry.text)
Note: Properties prefixed with _ (like _translation_id, _translation_keys) are private — use the helper methods on DialogicGlossary instead.
Translation
Glossary entries are translatable. Enable translation in Dialogic Settings, then use "Update CSV files". Entry names and alternatives must remain unique across translations, and may not start with Glossary/.
Translation
Dialogic supports translating timelines, character names, and glossary entries via CSV files. It uses Godot's built-in TranslationServer.
Setup
- In Dialogic Settings → Translation, enable translation.
- Choose a default locale (the language you write in — used as fallback).
- Set translation file mode: "Per Project" (one CSV) or "Per Timeline" (one CSV per
.dtl). - Set a translation folder to keep CSV files organized.
Workflow
1. Write/Edit timeline  →  2. "Update CSV files"  →  3. Edit CSV translations
       ↑                                                           ↓
       └────────────────── 4. "Collect translation"  ←──────────────┘
CSV format:
keys,en,ja
Text/1/text,Hello World!,こんにちは世界!
- Column headers are locale codes (
en,ja,fr, etc.). - Each row's key identifies the translatable unit:
Text/<event_id>/text,Character/<id>/name,Glossary/<hash>/name, etc. - Commas in text must be escaped by wrapping in quotes.
Important: After editing a translated text's original, you MUST regenerate by clicking "Update CSV files" again, or translations won't apply to the changed text.
Translation IDs in Timelines
After enabling translation, Dialogic inserts #id:<number> markers at the end of text events:
Character: Hello world! #id:14
- Yes, I do! #id:16
These IDs link the text to its CSV row. They are not visible during gameplay.
Changing Language
# Switch to Japanese at runtime
TranslationServer.set_locale("ja")
Testing in Editor
Use the "Testing locale" dropdown in Settings → Translation. This is editor-only and may not work in exported builds.
Audio Channels
Audio plays on named channels. Default channels defined in project settings:
DialogicUtil.get_audio_channel_defaults()  # returns Dictionary
DialogicUtil.get_audio_channel_suggestions("search")
DialogicUtil.validate_audio_channel_name("name")
Channel names: "" (default), "music" (looping by default), plus custom.
Resource Management (DialogicResourceUtil)
# Directories (map identifier -> path)
DialogicResourceUtil.get_directory('dtl')         # timelines
DialogicResourceUtil.get_directory('dch')         # characters
DialogicResourceUtil.update_directory(extension)  # rescan

# Lookups
DialogicResourceUtil.get_timeline_resource("name")
DialogicResourceUtil.get_character_resource("name")
DialogicResourceUtil.get_unique_identifier_by_path("res://...")
DialogicResourceUtil.get_resource_path_from_identifier("name", "dtl")

# Label cache (editor only)
DialogicResourceUtil.get_label_cache()
DialogicResourceUtil.update_label_cache()

# Event cache
DialogicResourceUtil.get_event_cache()            # all event types
DialogicResourceUtil.update_event_cache()
Utility Helpers (DialogicUtil)
# Variables
DialogicUtil.VarTypes          # ANY, STRING, FLOAT, INT, BOOL
DialogicUtil.get_default_variables()
DialogicUtil.list_variables(dict, path, type)
DialogicUtil.get_variable_value_type(value)
DialogicUtil.get_variable_type(path, dict)
DialogicUtil.logical_convert(value)  # auto-convert string to int/float/bool

# Suggestions (for editor fields)
DialogicUtil.get_character_suggestions(search, current, allow_none, allow_all)
DialogicUtil.get_portrait_suggestions(search, character, allow_empty)
DialogicUtil.get_autoload_suggestions(filter)
DialogicUtil.get_autoload_method_suggestions(filter, autoload_name)
DialogicUtil.get_autoload_property_suggestions(filter, autoload_name)
DialogicUtil.get_audio_bus_suggestions(filter)
DialogicUtil.get_audio_channel_suggestions(search)

# Timer
DialogicUtil.is_physics_timer()
DialogicUtil.update_timer_process_callback(timer)
Project Settings
Key settings (under dialogic/):
dialogic/variables— default variable dictionarydialogic/layout/default_style— default style namedialogic/layout/end_behaviour— 0=free, 1=hide, 2=keep layout on enddialogic/text/letter_speed— default letter reveal timedialogic/text/autocolor_names— auto-color character names in textdialogic/text/split_at_new_lines— treat newlines as[n]dialogic/text/autopauses— auto-insert pauses after punctuationdialogic/extensions_folder— custom modules path (default:res://addons/dialogic_additions/)dialogic/directories/*_directory— resource directories (dch, dtl, style)dialogic/audio/channel_defaults— default audio channels
Working with Dialogic in This Project
Common Patterns
Starting dialog (guard against double-start):
func _input(event):
    if player_is_in_area and Input.is_action_pressed("start_interaction"):
        if Dialogic.current_timeline == null:
            Dialogic.start("my_timeline")
Reacting to dialog signals:
Dialogic.signal_event.connect(_on_dialogic_signal)
Dialogic.timeline_ended.connect(_on_dialog_finished)
func _on_dialog_finished():
    Dialogic.timeline_ended.disconnect(_on_dialog_finished)
    # game logic here
Setting variables from code:
# Direct property access (preferred)
Dialogic.VAR.player_name = "Miko"
Dialogic.VAR.coins = 42

# String-based access for dynamic names
Dialogic.VAR.set_variable("player_name", "Miko")
Dialogic.VAR.set_variable("coins", 42)

# Reset all variables to defaults
Dialogic.VAR.reset()
Creating timelines in code:
# From strings (follow text syntax)
var events: Array = """
Jowan (Surprised): Wow this is interesting!
- Yes
    set {excitement} += 20
- No
    set {excitement} -= 10
""".split('\n')
var timeline = DialogicTimeline.new()
timeline.events = events
Dialogic.start(timeline)
Hiding/showing textbox:
if Dialogic.Text.is_textbox_visible():
    Dialogic.Text.hide_textbox()
else:
    Dialogic.Text.show_textbox()
Getting current speaker:
var speaker: DialogicCharacter = Dialogic.Text.get_current_speaker()
var portrait_info := Dialogic.Portraits.get_character_info(speaker)
Troubleshooting
- Portraits not showing: Characters must join the scene with a Character Event (Join mode) before their portraits appear. Ensure
.dchfilename case matches timeline text exactly. - Wrong text displayed: If translation is enabled, CSV rows take priority. Disable translation during development or update CSVs.
- Lag on dialog start: Preload styles with
style.prepare()or preload an empty timeline during your loading screen. - Input conflicts: If your interaction key matches the dialogic input action, guard with
if Dialogic.current_timeline == null:before starting new dialog.